10 KiB
Magic Growing
Magic Wand Tool
In this task, you will implement the Magic Wand Tool, a helpful tool in many image editing softwares (like Photoshop).
The Magic Wand Tool (or MWT) is a selection tool. It allows you to quickly select areas of your images and make independent edits to them. Conceptually, MWT selects all pixels which are similar to a given reference pixel. In this task, a pixel is considered similar to the reference pixel if and only if their intensity is not too different from the reference pixel and they are connected to the reference pixel. We define what we mean by "not too different" and "connected to the reference pixel" more formally later.
Images
Note: For some browsers, the images might not be displayed correctly. Using a Chrome/Chromium-based browser should resolve the issue.
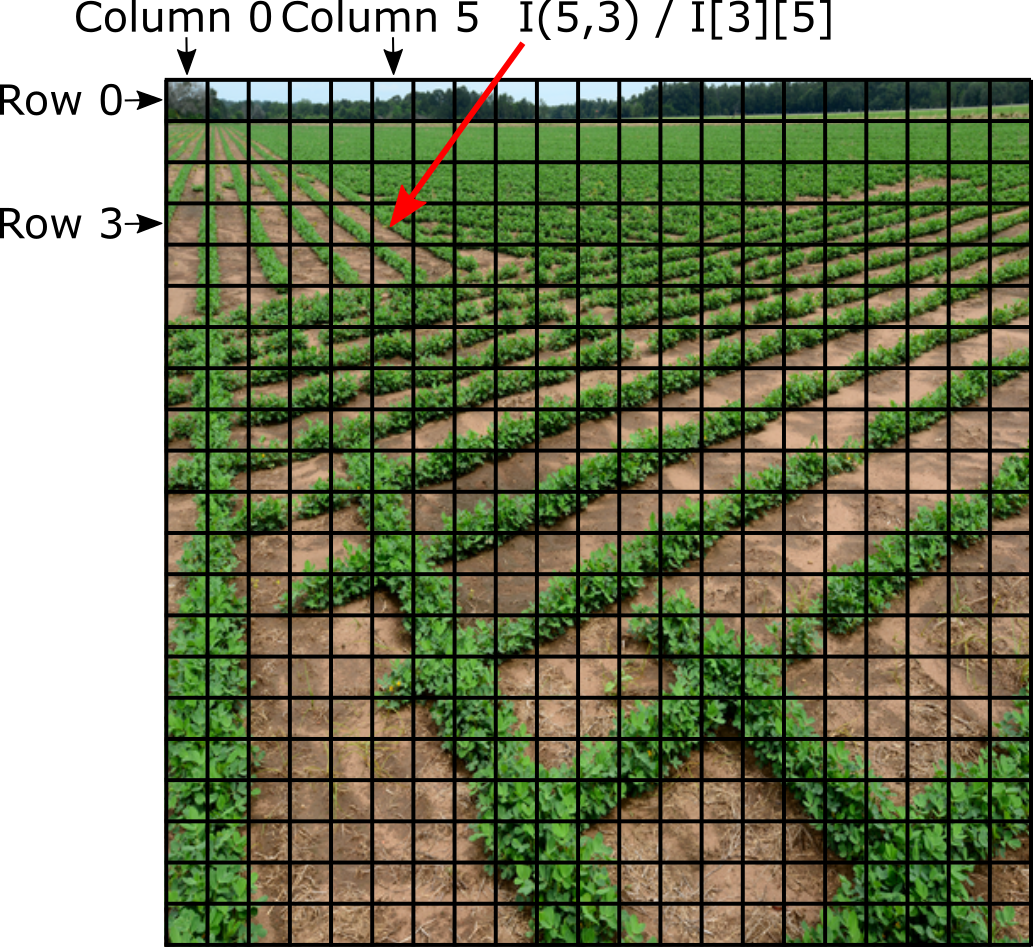
An image is a 2D array of pixels. Every pixel can be identified by its row index \(i\) and column index \(j\). We assume that row \(0\) is at the top of the image, and column j\(0\) is on the left of the image.
Caution!
Images are commonly stored in a row-major format. This means that we store an image as a vector of rows and a row as a vector of pixels. When accessing an image, you first get the correct row, then the correct column in that row. For example, if we have an image \(I\) and want to access the pixel at row \(i\) and column \(j\), we would write I[i][j].
However, pixel coordinates are commonly given as \((x , y)\), where \(x\) refers to the column (or width) and \(y\) to the row (or height). If we want to access the coordinate \((x , y)\) in image \(I\), we would write I[y][x] as visualized below.
This exercise contains three different types of images, which are defined in bitmap.h and explained below.
RGB Image
You won't have to deal with this type of image yourself, so feel free to skip this section.
An RGB image is an image where each pixel consists of three values: \(r\), \(g\), and \(b\). These values indicate how much red, green, and blue light is emitted by the pixel. The three values are in the range \([0, 255]\), giving us \(256^3\) different colors we can represent.
In this task, an RGB image is stored as an RGBImage, which is a type alias for std::vector<std::vector<std::tuple<int, int, int>>>. For simplicity, we represent each pixel value using an int in the code, and you can assume that our provided images have values in the valid range.
Note: Since we are using .bmp images, the pixels are actually stored in the BGR format.
Grayscale Image
Grayscale images do not contain any color information. Instead, every pixel consists of a single number indicating how bright the pixel is. The values are in the range \([0, 255]\), giving us \(256\) possible brightness values. \(0\) means the pixels emits no light (black), and \(255\) means the pixel emits as much light as possible (white).
In this task, a grayscale image is stored as a GrayscaleImage, which is a type alias for std::vector<std::vector<int>>. For simplicity, we represent each pixel value using an int in the code, and you can assume that our provided images have values in the valid range.
Image Mask
Image masks are similar to grayscale images, but we represent each pixel with a bool. Therefore, pixels can either be on (true) or off (false).
In this task, an image mask is stored as an ImageMask, which is a type alias for std::vector<std::vector<bool>>.
Pixel Neighborhood
A pixel neighborhood defines the set of pixels which are considered neighbors of a given pixel.
In this exercise, we use the so-called 4-neighborhood, which consists of four pixels, i.e., the pixels to the left, right, top, and bottom of the current pixel. Formally, the 4-neighborhood of a pixel \((x,y)\) is defined as the set of pixels at the coordinates \((x-1,y)\), \((x+1,y)\), \((x,y-1)\), and \((x,y+1)\).
Of course, the neighborhood only consists of pixels that are part of the image, so a pixel at the left edge of the image does not have a left neighbor.
Task
Your task is to implement the function ImageMask MWT(...) in mwt.cpp. The function takes a grayscale image \(I\), a pixel coordinate \((x,y)\), and a threshold \(T\) as arguments. It returns an image mask \(M\), which indicates for each pixel in the grayscale image whether or not it is similar to the pixel at coordinate \((x,y)\). A pixel \((x',y')\) is considered similar to reference pixel \((x,y)\) if the absolute difference between \(I[(x,y)]\) and \(I[(x,y)\) is at most \(T\) and there exists a path of similar pixels from \((x,y)\) to \((x',y')\).
Formally, \(M[(x',y')]\) is true if and only if there exists a sequence of pixels \(P = [p_1, ... , p_n]\) for which the following conditions hold:
- \(p_1 = (x,y)\)
- \(p_n = (x',y')\)
- \(p_{i+1}\) is in the 4-neigborhood of \(p_i \forall i \in [1, ... , n-1]\)
- \(|I[p_i] - I[(x',y')]| \leq T \forall i \in [1, ... , n]\)
Hints
- You might need helper functions for the recursive call.
- If you pass a reference to an image to a function, any changes that function makes to the image will be visible outside of the function.
Input
When the program starts, you are first prompted to select an image. Your options are: bank, field, peppers, and pigs.
Next, you are prompted to enter the \((x,y)\)-coordinate of the reference pixel and the similarity threshold \(T\) as three integers separated by spaces.
Then, the selected image is loaded, converted to GrayscaleImage, and the ImageMask indicating similar pixels is computed using the ImageMask MWT(...) function.
Finally, the number of identified similar pixels (including the initial pixel) and the bounding box of the selected area (as \((x_{left}, y_{top}, x_{right}, y_{bottom})\)) are printed to the console.
Additionally, an image is saved, which visualizes the reference pixel in red, the bounding box in green, and makes non-similar pixels darker, so that the similar pixels can be seen easier. The saved image can be found under the Files tab.
Example
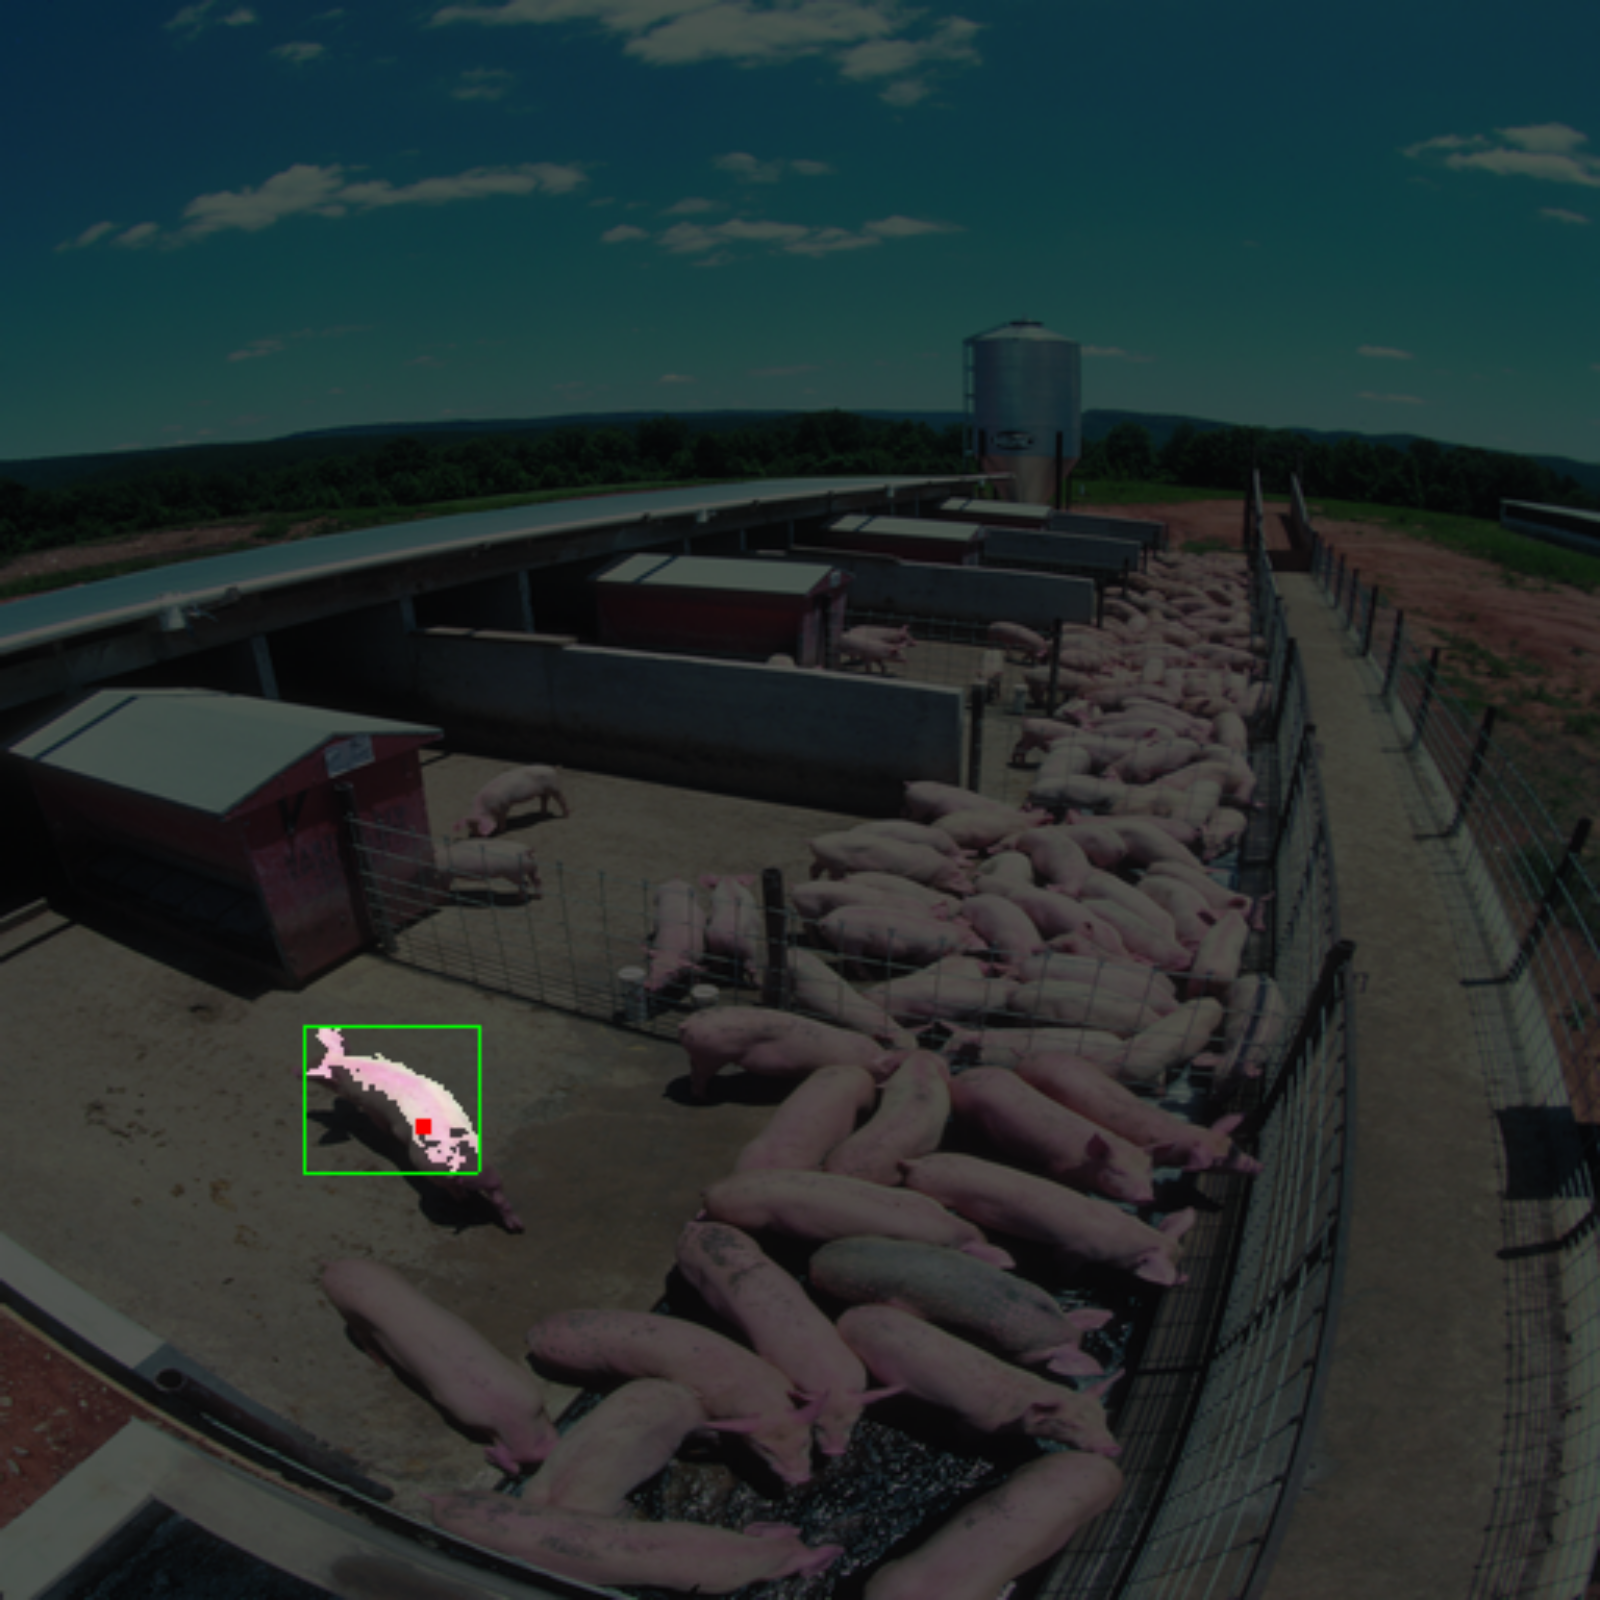
Select an image: pigs

Select a pixel (x y) and a threshold (T): 135 360 20

Number of selected pixels: 712

Bounding box (97, 328, 153, 375)
The example above should result in the following output image:
Notes About Program Robustness
- You don't have to make your code robust against wrongly formatted inputs. This means that you can safely assume that the entered image exists and the coordinates are valid indices of the image.
- Large thresholds may produce an excessive number of recursive calls leading to a segmentation fault (
The process exited with code -11). The current test cases (also the replaced and hidden ones) have relatively small selected regions and should thus not cause segmentation faults for correct implementations.
Important: Testing and Grading
- When grading your solution, we are going to test your submission with two sets of tests: replaced and hidden, which make up ~70% and ~30% of the total number of points respectively. The replaced tests are going to be very similar to the ones that are used by the auto-grader when you click on the “test” button. The hidden tests are additional tests that check some tricky corner cases not covered by the typical tests. The hidden tests will be used only when grading your final submission after the deadline. The final number of points awarded to your solution is the sum of the points from the replaced and hidden test cases. As we have not added the hidden test cases yet, the maximum percantage you can achieve before we add them during grading is 71.43%.
- Please check the autograder output carefully. It is possible to pass test cases, but not get any credits for them. This is the case when your code contains compiler warnings or errors. Note that the message detailing the final score might take some time to appear. For example, with the following output, you would not receive any credits for this bonus exercise even though one test case passes:
Tests result: passed 1 of 10

[ERROR] Your program had compilation warnings. Please click on the compile button to see them.

Please fix the errors reported above.

The final score assigned by automatic checks: 0.00%- We recommend that you print all output that is not part of the output required by us (i.e., additional output that you use for debugging) to
std::cerrinstead ofstd::cout, as additional output might confuse the autograder and lead to hidden or replaced test cases failing. - Hint: To ensure that your solution passes not only the replaced tests but also the hidden ones, test it thoroughly with additional examples. When doing so, do not forget to check for edge cases because these are the ones we may focus on in the hidden test suite. Remember! Passing all tests does not imply that your program is correct: “Program testing can be used to show the presence of bugs, but never to show their absence!” (Edsger W. Dijkstra).
Solution
#include "mwt.h"

#include <assert.h>
#include <cstdlib>

void MWT_rec(int ref, ImageMask &mask, const GrayscaleImage &image, int x,
             int y, const int T) {
  int height = image.size();
  int width = image[0].size();

  if (x < 0 || x > height || y < 0 || y > width)
    return;

  int new_ref = image[y][x];

  if (std::abs(ref - new_ref) > T) {
    mask[y][x] = false;
    return;
  }

  if (!mask[y][x]) {
    mask[y][x] = true;
    MWT_rec(ref, mask, image, x - 1, y, T);
    MWT_rec(ref, mask, image, x + 1, y, T);
    MWT_rec(ref, mask, image, x, y - 1, T);
    MWT_rec(ref, mask, image, x, y + 1, T);
  }
}

// PRE:  All rows in image have the same size.
//       x and y must be valid indices of the image.
// POST: Returns a matrix of bools where every true value corresponds to a pixel
//       with at least one path of T-similar pixels starting at x,y.
ImageMask MWT(const GrayscaleImage &image, const int x, const int y,
              const int T) {
  // get image dimensions
  const int height = image.size();
  assert(height > 0);
  const int width = image[0].size();
  assert(y < height && x < width);

  // init mask
  ImageMask mask(height, ImageMaskRow(width, false));

  int ref = image[y][x];

  MWT_rec(ref, mask, image, x, y, T);

  // return mask
  return mask;
}
Made by JirR02 in Switzerland 🇨🇭